Saturday, December 31, 2011

Black Pepper Chicken Puff

M.I.A. for quite a while as I was really very tied up with lots of things that have been happening during the last few months. Hb and kids were all asking me when can I start baking again but I was just too tired to do anything... (~.~)

Feeling a bit....bit guilty ..... I decided to make something real simple to fulfill their tastebud. ^,^

Tender chicken chunks marinated in rich black pepper sauce, wrapped with a flavourful combination of flaky pastry.


Saturday, October 8, 2011

Tea Infused Baking

Attended "Tea Infused Baking" workshop yesterday with my buddy.  It was an interesting and fulfilling session, we learnt some new tricks and we are both very surprised that tea leaves can be incorporated in so many types of bakes.

I have tried making buttercream fo my cakes before but never succeed because the cream always end up too watery.  Not sure why?????  >.<  Luckily,the making of Marshmallow Buttercream for the Macarons is part of the workshop, its simple, taste nice and yet not too sweet. :)


Green Tea Macarons w Marshmallow Buttercream. 


I was so happy to see "feet" appearing during the baking. :)


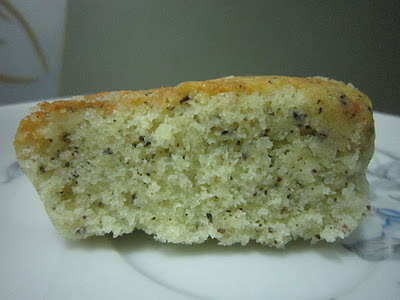
Earl Grey tea is one of my favourite tea, it's a tea blend with a distinctive flavour and aroma derived from the addition of oil extracted from the rind of the bergamot orange, a fragrant citrus fruit. Both my kids like the cake alot, boy commented that the top is cripy and the  inside is moist, he was hopping that I can make it again. :) To me, this recipe is certainly a keeper and I'm grateful to Anna, Sugar Inc for sharing.

Earl Grey Milk Tea Cake


Those little black dots are earl grey tea leaves...very sweet and smell heavenly.

Since ancient, Chamonile tea has been used as a healing drink so it's no wonder that it is estimated that over 1 million cups are ingested every day. It's best known ability is to help you relax. Many people like to drink it before bedtime as a sleep inducer and one herbal medicine guide claims that drinking chamomile tea before bed will stop nightmares.  Just wondering if it will be the same effect just by eating Honey Chamonile Cookies? (^.^) 

Personally I like this cookies as it was very crispy and it leaves a little minty taste in my mouth after eating. 
Honey Chamonile Cookies


Sunday, September 18, 2011

Flower Bun & Ham Rolls


My kids asked me this morning if I can make some buns for them to bring to school tomorrow.  As I still have some white lotus paste in my fridge, I agreed. I remembered seeing this very pretty flower shape mooncake somewhere before so I thought it may be a good idea to shape my buns into “flower”.

After making all the “flowers”, still have some dough left, so I just ask the kids to flatten the dough, put a ham in the middle and roll it up. J


Here is the recipe for the Basic Bread Dough taken from Bread Code with a slight modification.

Ingredients A:
500g high protein flour
1 tsp instant yeast

Ingredients B:
60g sugar   (will increase next time as I prefer sweeter bread)
1 tsp (5g) Salt   (I omitted as I used salted butter)
1 tsp (5g) milk powder   (I replace this with soya milk powder)

Ingredients C:
1 Egg
250g water

Ingredient D:
5og butter

Method:

  1. Put ingredients A in a mixer and blend at low speed for 1 min.
  2. Add ingredients B, blend for 1 min.
  3. Add ingredients C, blend at low speed for 1 min, then use medium speed to blend for 5 min until dough-like.
  4. Add ingredient D and continue to blend 10-15 mins till dough is shiny and springy (I didn’t use mixer so hand kneading will take about 30 mins)
  5. Use a wet towel to cover the dough and allow to leaven for 45mins till the dough doubled.
  6. Divide the bread dough into 40g and wrapped the white lotus paste, flatten and use a knife to cut out 5 openings.
  7. Place on baking paper, glazed with beaten egg  and sprinkle some almond nuts in the center of the flower (additional step by me)
  8. Place into pre-heated oven, baked at 180 C for 20 mins.
  9. Cool on cooling rack.

Monday, September 12, 2011

中秋节 Mid-Autumn Festival


The Mid-Autumn Festival is here again and traditionally on this day, all the family members and friends will gather together to admire the bright round moon and eats mooncake.
Wishing everyone Happy Mid-Autumn Festival!
祝大家中秋节快乐!


My 1st batch of snowskin mooncake.  There are 2 types of lotus paste wrapped within.  The inner filling is chocolate paste and the outer layer is white lotus paste with melon seeds. I use chocolate emulco to make the chocolate flavoured snowskin. 


My 2nd batch of snowskin mooncake.  I wrapped premium dried cranberries with a layer of white lotus paste with melon seeds.  I chopped and added some cranberries to the snowskin to give it a nice and chewy feel.

My 3rd and last batch, used 2 difference snowskin, green apple and red cherry to wrapped the chocolate paste with almond nuts.  I love this batch the most as it was very colourful. J


Ingredients for Filling:
1 kg of lotus paste + 120gm of melon seeds + 80g dried cranberries
1 kg of chocolate paste + 150 gm of chopped almond nuts

Ingredients for Snowskin:
1000 g Snowskin flour (Premix)
500-550 ml cold water
200g – 220g  shortening
Chocolate emulco for the chocolate snowskin
Chopped dried cranberries for the cranberry snowskin
few drop of green apple colouring and cherry red colouring

Method

1. Snowskin: Sift kao fen into a mixing bowl and add the cold water and mix well.
2. Rub in shortening and knead lightly.
3. Divide the dough into 3 portions and add in the chocolate emulco, cranberries and colouring to each portions.
4. Knead until a soft dough is form and set it aside for 15-30 minutes.
5. Weigh the skin and wrapped the paste and roll it into a round ball.
6. Coat with some cooked glutinous rice flour and pressed into mould.
7. Unmould it and keep it refrigerated.
8. Thaw a few minutes before serving.

Sunday, July 10, 2011

Steamed Bao Revisit

Was clearing my cabinet, noticed that I still have some 200g of Hong Kong flour left.  So I thought why not revisit the steamed bao recipe again.  I was very impressed by the Cartoon Bao: Doraemon, Kitty and Elmo made by Fatmum some time back.  As I have read the book on the cartoon bun at the bookshop before, I decided to try the pocupine and rabbit design. *grin*

I must say that pocupine is much easier to make cos I just need to cut along the whole bun whereas rabbit is more difficult as the long ear keep falling back.


dough recipe can be found here.

Wednesday, July 6, 2011

Banana Chocolate Cake

Today is my Dearest Mommy's Birthday Day!

Happy Birthday Mommy!  Hope you like the cake I made specially for you!

Sunday, June 26, 2011

Pandan Cotton Cake

Today is last Sunday before school reopen again after 4 weeks break. My life is going to be stressful again but then I think I need to take thing easy.  Need to clear the 2 packs of coconut cream in my fridge. The first time that came to my mind was pandan chiffon cake.  However, I have to give up the idea because I don’t have a tube pan!! (fantastic excuse).  Actually the truth is that I am afraid of failure. (>_<)

I ran a search online and this pandan cotton cake from Bakericious blog caught my eyes.  I replaced the milk with coconut cream.  The texture of the cake look cottony just like the name, it’s very soft and moist with a nice hint of pandan taste.  However, I am a bit disappointed as the cake didn’t raise as much as I would expected. (it could be due to the bigger tin I use)


Adapted and slightly modified from bakericious

Ingredients :

(A)
30g butter
45g cake flour

(B)
3 egg yolks
40g coconut cream
  Tbsp pandan paste + 2 Tbsp water
(C)
3 egg whites
40g caster sugar

Methods:

1. Melt the butter. Pour in the sifted cake flour and mix well.

2. Add pandan paste to water and coconut cream, mix well.

3. Beat the egg yolk lightly, add in 1/3 of the pandan mixture and mix well. Pour in the remaining mixture and mix till well combine.

4. In another bowl, whisk egg whites until frothy. Add sugar gradually and beat till soft peak.

5. Fold in 1/3 of the egg whites to the yolk mixture till well combine. Pour in the remaining egg whites and mix well.

6. Pour the batter into baking tin, lightly bang the pan to reduce air bubbles.

7. Bake over water bath at 160C about 30 minutes.

8. Once cooked, invert the cake on wire rack. Cut the cake when completely cool.

Saturday, June 18, 2011

Ballerina Birthday Cake

Celebrating my lil Princess 8th Birthday with a Ballerina cake. :D

Wednesday, June 1, 2011

Mango Strudel

It's mango season and I just cannot resist those sweet and juicy mangoes that I saw at the supermarket. Still have a pack of puff pastry in my freezer so I thought it may be a good idea to make some mango strudel after seeing one baking pal, Eileen making it some time back.


Tuesday, May 10, 2011

Ribena Marble Cheesecake


I love cheesecake and so does the little ones at home. This is my 4th time doing non baked cheesecake. It is just so easy and simple because there is no baking involve.  Love the Ribena taste as it is just so refreshing and chilling, just nice for today hot weather.


Ingredients

crust:
150g digestive biscuits, finely crushed
60g butter, melted

filling:
100ml water
20g (2 tablespoons) gelatin granules/powder
250g cream cheese, soften at room temperature
75g caster sugar
250ml (1 cup) natural plain yogurt
75ml Ribena blackcurrant juice cordial

topping: (I omitted this)
100ml water
2 teaspoons gelatin granules/powder
80ml Ribena blackcurrant juice cordial.

Method:

 
1.   Line the sides of a 18-20cm round pan (with a removable base) with parchment paper or clear plastic sheet (I cut out a strip of plastic sheet from a cookie bag), set aside. To make the crust, combine crushed digestive biscuits and melted butter together in a mixing bowl. With the back of a spoon, press the biscuit crumbs onto the base of the prepared pan. Chill in the freezer compartment for at least 1 hour. (To ensure the crust is even, I used the base of a flat-bottom glass to press down the crumbs.)

2.   Filling: Measure water into a bowl and sprinkle in the gelatin (without stirring with a spoon). Set aside to allow the gelatin grains to swell (10 mins) before setting the bowl over a pot of simmering hot water. Stir with a spoon and once the gelatin melts, remove the bowl from the pot and set aside to cool to room temperature.

3.   With an electric mixer, beat cream cheese and sugar together until smooth. Add in the gelatin solution and yogurt, beat till the mixture turns smooth.

4.   Divide mixture evenly into two bowls (about 1 cup each). Add 75ml of Ribena into one of the bowls and mix well with a spatula.

5.   Spoon the two mixtures in alternate blobs into the chilled crust. Level top and swirl with a knife through the mixture to create a marble effect. Refrigerate until set (about 2 hours as stated in the recipe, but I left mine to set over night since I omitted the topping).

6.   Topping: Measure water into a bowl and sprinkle in the gelatin. Set aside to allow the gelatin grains to swell (10 mins) before setting the bowl over a pot of simmering hot water. Stir with a spoon and once the gelatin melts, remove bowl from the pot and stir in 80ml of Ribena. Set aside to cool. When completely cooled, pour mixture over the cheesecake and chill for several hours or overnight until set.

Got this beautiful recipe Ribena Marble Cheesecake from HHB, Thanks to her for sharing.

Sunday, May 1, 2011

Mother's Day Fresh Cream Fruit Cake

Mother's Day is on 8th May but we decided to celebrate it earlier because it clashes with the Polling Day and School examination.  What' better way to pay tribute to all  Mothers' than with a unique and delicious cake? Here’s my contribution to today celebration, my very own version of a Fresh Cream Fruit Cake.

Wishing a very Happy Mother's day to all the Beautiful Moms!! !!

Mango Mousse Cake for my FIL

We had planned to celebrate my father-in-law birthday today.  I made another attempt on the mango mousse cake because my father in law was all praise for it when he ate it during our gathering on my hb’s birthday.

I started off with the making of sponge cake with the usual recipe then the mango mousse. All went well until I started layering the sponge with mousse yesterday morning. Somehow the sponge cake was thicker this time round and I didn’t notice it at all (~_~).  By the time I realized, it was too late already.  The mousse has reached the top of the cake ring and there is just no space left for my mango puree topping L so I end up with just topping it with some fruits. :P

Sunday, April 24, 2011

Steamed Chicken Bao

Trying to do something to keep my mind away from all the trouble I had been encountering at work.  Decided to make some steamed chicken bao so that that Hb and lil ones can have some snack during tea time. 

After rising the dough, I noticed that the dough is still very sticky which shouldn't be the case. =(  I must be still thinking about work while kneading .....  sigh!

See my super woper ugly bao!! (compared to the 莲蓉包 I did last yr)


dough recipe can be found here.

Sunday, April 17, 2011

Orange Pound Cake

My kids told me at the very last minute that my SIL and her boys will be coming over in the late afternoon as they want to play soccer.  As my nephews like to eat cake, I "quick hand quick leg" gather all the ingredients I could find in my cupboard and came out with an orange butter pound cake.

Despite being done in a hurry and a burned cake top *red face* (cos I lost track of the timing) this cake still tasted wonderfully good. (^.^) The orange juice and zest gave the pound cake a nice smell and it very moist. :) 


Recipe for pound cake:-
250g butter
100g sugar
(I reduced the sugar to 70g, but still too sweet for me)

250g
cake flour
1 tsp baking powder
4 large eggs

1/3 cup orange juice
1 tsp orange zest

1.
Whisk butter, sugar, cake flour & baking powder @ med speed for 1 min.
2. Add in eggs gradually, 1 at a time and whisk at med speed for 5 mins till smooth.
3. Add orange juice and blend well at slow speed
4. Add orange zest and mix well.
5. Pour batter into a baking pan.

6. Bake in a preheated oven of 170C for 40 mins. (need to watch as the top may get burned)

Zebra Sponge Cake

I came across a zebra cake the other day and I must say that I was fascinated by the beautiful stripes of the zebra cake. Since I have some cake flour left, I went ahead to bake this zebra sponge cake instead of the usual zebra butter cake.  Hb tasted and gave his thumb up but he did mention that it could be sweeter. :P


Ingredients:

5 eggs

250g cake flour
50g ice water
50g corn or veg oil

Cocoa mixture
2 tsp cocoa powder
1 tsp chocolate emulco


Method:

1. Pre-heat oven at 170c.
2. Put all ingredients (except oil) into a mixing bowl and whisk at high speed for about 10 mins till the mixture is thick and smooth.
3. Add the oil and whisk at low speed till well mixed.
4. D
ivide the batter into 2 equal portion and fold in cocoa powder & chocolate emulco into one of the portion
5. Using a tablespoon, scoop 2 tbsp of plain batter into the centre of the cake pan. Then scoop 2 tbsp of chocolate batter onto the plain batter in the cake pan, you will need to reduce the scoop to 1 tbsp or lesser when you reach the end so that the circle pattern will get smaller.
6. Repeat until you have finished all the batter.

7. Bake at 170c for 25 – 30 mins

Tuesday, March 29, 2011

Mango Mousse Cake

Have been looking around for the past 2 weeks for some cake ideas because the man that I love most (^.^)  is celebrating his 40th Bday!! After filtering out many many types of cake that I know I m unable to bake at all, finally gave him two choices, tiramisu or mango mousse cake, he chose the latter.  With my lack of experience (in fact, it was my 1st attempt on mousse cake) and skill (can see from the uneven edges) *blush* , this is the best i can do for my dearest hb.

Happy Birthday my Dearie!!

Big cake for our little celebration, mini heart shape cake specially for my dearie

see the uneven edge... :P

at least the this layer look decent enuff...hahahaa....


Sponge cake

5 eggs
250g cake flour
50g ice water
50g corn or veg oil
1 tsp of mango flavor essences

1. Put all ingredients (except corn/veg oil) in a mixing bowl and whisk at high speed till the mixture is thick.
2. Add the corn/veg oil and whisk at low speed till all are mix well.
3. Pour batter into a 8” round tin and bake @ 180c for 20-25 mins
4. Remove sponge cake from tin immediately and leave it to cool.


Mango Mousse

360g whipped fresh cream
330g mango puree
1 mango, cute into cubes
20g gelatin powder
4 Tbsp of water
40g sugar (optional)

1. Combined mango puree, water, sugar and gelatin powder in a pot and bring to boil till gelatin and sugar dissolved.  Leave aside to cool.
2. Whipped fresh cream till soft peak and mix into the above mango mixture and add in mango cubes.
3. Cut the sponge cake into 2 layer, lay the 1st layer at the bottom of an adjustable cake ring.
4. Pour half of the mango mousse onto the sponge cake and spread evenly.
5. Lay the 2nd layer of the sponge cake onto the mousse, pour the balance of the mango mousse onto the cake and spread evenly.
6. You can use a scraper to level the top and make sure that there is at least ½ inches left at the top of the cake ring for mango puree topping.
7. Chill the cake overnight.


Mango Puree topping

150g mango puree
50g water
1 Tbsp of plain agar agar powder

1. Combined all into a pot and boil till all dissolved.
2. Pour the puree topping thru a strainer
3. Cool down the puree a little and pour it on top of the mango mousse cake carefully.
4. Set the cake in the fridge for an hour

* Deco with fresh fruits before serving.